
Discovering air leaks during a final blower door test can create an immediate problem for site teams. Walls may already be closed, finishes may be installed and the trades responsible for the airtight layer may have moved on to other work.
Good building airtightness is not achieved through one final inspection. It depends on clear design, careful workmanship and checks carried out while the building envelope remains accessible.
A blower door test measures overall building air leakage under a controlled pressure difference. Local diagnostic methods can then help site teams investigate where individual leakage paths may be located.
This construction-stage approach was used at Texas Pickle Hall, where crews used a Coltraco Portascanner during real-time air-sealing work. The building later recorded an airtightness result of 0.22 ACH50 on blower door test day.
How Can You Improve Building Airtightness Before a Blower Door Test?
To improve building airtightness before a blower door test, define a continuous airtight layer, inspect key junctions, seal service penetrations and check windows and external doors. Carry out mid-construction checks while the building fabric remains accessible, record any air leaks and retest repaired areas.
A pre-test cannot guarantee the final result, but it can give site teams an opportunity to address leakage before the completed building undergoes whole-building testing.
What Is Building Airtightness?
Building airtightness describes how effectively a building limits uncontrolled air movement through gaps, cracks and openings in its external fabric.
A building still needs planned ventilation. Airtightness is concerned with preventing air from entering or escaping through unintended routes rather than stopping all air movement.
A clear and continuous building envelope allows ventilation systems to supply outside air through planned openings. Without this control, the direction and volume of airflow can change with wind, temperature and building pressure.
Building airtightness can affect:
- Energy efficiency
- Heating and cooling demand
- Occupant comfort
- Indoor air quality
- Ventilation-system performance
- Regulatory compliance
- The amount of uncontrolled air leakage
These principles apply to both residential buildings and commercial buildings, although the size of the enclosure and the testing equipment required may differ.
Why Does Building Air Leakage Matter?
Building air leakage occurs when air passes through unintended openings in the building envelope.
Warm internal air may escape while colder outside air enters elsewhere. In warmer climates, humid outside air may also enter the building and affect its cooling and dehumidification requirements.
The effect will depend on the size, use, envelope and mechanical systems of the building. The underlying issue remains the same: uncontrolled leakage makes it harder for the building to perform as intended.
Air tightness must therefore be considered alongside ventilation. Sealing unwanted gaps does not remove the need for fresh air. It allows the required air changes to be provided through intended ventilation systems rather than relying on uncontrolled leaks.
Where Are Air Leaks Commonly Found in the Building Envelope?
Air leaks are often concentrated around interfaces and penetrations rather than spread evenly across the entire building.
Areas worth checking include:
- Window frames
- External doors and door frames
- Wall-to-floor junctions
- Wall-to-roof junctions
- Service penetrations
- Pipes, ducts and electrical cables
- Structural connections
- Access hatches
- Changes between construction materials
- Areas disturbed by later construction work
Windows and doors require particular attention because several materials and components meet within a relatively small area.
Service penetrations can also create leakage where pipes, cables or ventilation equipment pass through the airtight layer. Each opening may appear minor in isolation, but the combined leakage can affect the result for the entire building.
Blower Door Test: Building Airtightness and Air Leakage Explained
A blower door test measures how much air passes through a building envelope when a controlled pressure difference is created between the inside and outside.
The test produces a result for the building as a whole. It can show whether the finished enclosure meets a project, certification or regulatory target, but it does not always identify the exact position of every leak.
How Does a Blower Door Fan Work?
A blower door system normally includes:
- A large fan
- A temporary frame or panel
- Pressure-measuring equipment
- Airflow-measuring equipment
- Software or recording tools
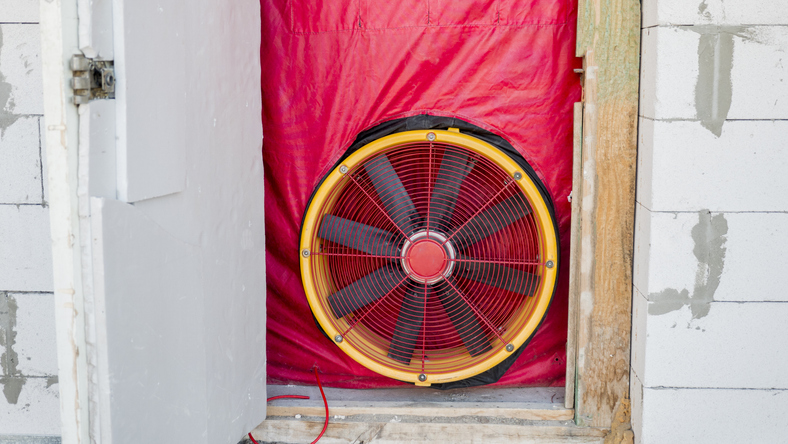
The blower door fan is installed in an external doorway, which may also be described as an exterior doorway.
Internal doors are generally opened so the intended internal volume can be included in the test. Windows and external doors are closed, while other openings may be temporarily sealed where permitted by the selected method.
When the test begins, the fan draws air out of the building or forces air into it. This creates a pressure differential between the interior and exterior.
The testing equipment records the airflow required to hold the building at a specific pressure. Measurements can be taken at several pressure levels, with the data collected used to calculate the overall leakage performance.
Weather conditions can affect the process. Wind and other pressure fluctuations may make readings less stable, particularly when measurements are taken at low pressure.
Blower door testing equipment is available in different sizes and configurations. Larger commercial buildings may require more than one fan to create the required pressure difference.
How Are Blower Door Test Results Measured?
The way blower door test results are expressed depends on the standard and purpose of the test.
Common measurements include:
- Air changes per hour
- Air change rate
- Air permeability
- Airflow rate
- Flow rate at a stated pressure
- Cubic metres of air per hour
- Effective leakage area
For Passive House projects, the result may be expressed as air changes per hour at a pressure differential of 50 Pa.
Other forms of air leakage testing may report the cubic metres of air passing through each square metre of building envelope per hour at a stated pressure.
The final result shows the overall performance of the building. Finding the locations responsible for that result may require a separate diagnostic process.
How Can Site Teams Improve Air Tightness Before Testing?
The most useful time to find a leak is while it can still be reached.
Site teams should treat air tightness as part of the construction process rather than a task reserved for final compliance testing.
This starts with a clear understanding of the intended airtight layer. Everyone working on the building should know:
- Which materials form the airtight barrier
- How those materials connect at junctions
- Who is responsible for each area
- How services should pass through the airtight layer
- How completed sealing should be protected
- How defects will be recorded and corrected
A drawing may show a continuous airtight line, but the completed result depends on how that line is maintained during construction.
Why Carry Out a Pre-Test or Mid-Construction Air Test?
A pre-test or mid-construction check gives the project team an opportunity to assess the building before the final air test.
At this point, parts of the envelope may remain visible and accessible. This can make it easier to inspect seams, joints, windows, doors and service penetrations.
The pre-test may involve whole-building pressure testing, local inspection or another diagnostic method. The method should reflect the construction stage and the information the team needs.
Before the first attempt at final testing, check:
- Whether the airtight layer is complete
- Whether known leaks have been repaired
- Whether repaired areas have been tested again
- Whether relevant windows and doors are installed
- Whether service penetrations are sealed
- Whether later work has damaged completed areas
- Whether the building is prepared for the selected blower door methods
- Whether the correct fan and testing equipment are available
- Whether weather conditions are suitable
- Whether reporting requirements are understood
Temporary sealing should only be completed where it is permitted by the applicable test method. It should not be used to hide incomplete construction work.
How Can Ultrasonic Tightness Testing Help Find Air Leaks?
Coltraco Ultrasonics develops ultrasonic and acoustic instrumentation for locating and assessing potential leakage paths. Within the built environment, this work is supported by Portascanner® AIRTIGHT.
An ultrasound generator is positioned on one side of the part of the enclosure being examined. A receiver is used on the other side to scan seams, joints and surfaces.
Where ultrasound passes through an opening, the receiver identifies a change. This allows site teams to investigate particular routes through the enclosure rather than relying only on the whole-building result produced by a blower door fan.
Ultrasonic tightness testing can support:
- Checks during construction
- Investigation before a blower door test
- Examination of particular junctions
- Retesting after remedial sealing
- Local checks within larger buildings
- Testing where minimal disruption is preferred
This does not make ultrasonic testing a substitute for a required blower door test or certification process. The two methods answer different questions.
A blower door test asks:
How much air passes through the building under a controlled pressure difference?
Ultrasonic tightness testing asks:
Where can ultrasound pass through this part of the enclosure?
Used as complementary methods, they can provide whole-building measurement alongside more focused information about individual leakage points.
Readers can learn more about how ultrasonic tightness testing works or view Coltraco’s range of ultrasonic air tightness testing equipment.
How Do Different Airtightness Testing Methods Compare?
The right method depends on the building, the stage of construction and the result required.
| Method | Main purpose |
| Blower door test | Measures the overall air leakage of a building using fan pressurisation or depressurisation |
| Pulse testing | Measures how building pressure responds to short releases of air |
| Ultrasonic tightness testing | Investigates individual routes through which ultrasound passes |
| Visual inspection | Checks the continuity and workmanship of the airtight layer |
Blower door systems and pulse testing use changes in building pressure to assess overall airtightness.
Ultrasonic testing has a different role. It helps site teams investigate particular leakage routes and can be used before, during or after whole-building air tightness testing.
The method fits the project only when it provides the required output. Building owners and project teams should confirm the applicable reporting and regulatory compliance requirements before choosing an approach.
A single fan may be suitable for many residential buildings, while a large commercial property may require several fans to establish the necessary building pressure.
How Do Airtightness and Ventilation Affect Indoor Air Quality?
Airtightness and ventilation should not be treated as opposing goals.
Uncontrolled leakage cannot provide a dependable supply of fresh air. Its airflow rate changes with:
- Wind
- Internal and external temperature
- Pressure differences
- The position of leaks
- The operation of fans and mechanical systems
A planned ventilation system can supply outside air at the required flow rate and remove stale air through intended routes.
As building airtightness improves, the ventilation strategy becomes more important. The design must provide the airflow required for occupied spaces rather than expecting gaps in the envelope to ventilate the building.
Building owners and project teams should therefore consider airtightness, heating, cooling, ventilation and indoor air quality together.
What Does the Texas Pickle Hall Case Study Show?
Texas Pickle Hall is an approximately 31,500-square-foot, three-storey, twelve-court indoor active entertainment facility in Live Oak, Texas.
It is located on Interstate 35 between Austin and San Antonio. The facility was designed and built to Passive House standards while seeking PHI certification.
Construction crews used a Coltraco Portascanner during the build as part of real-time air-sealing collaboration.
On blower door test day, the building recorded 0.22 ACH50. The supplied project information states that this was 63% better than the cited Passive House standard of 0.6 ACH50.
The building envelope was also linked with changes to the mechanical design. The original cooling design totalled 88 tons, while the installed system was 26 tons. HVAC electrical demand fell from 286 kilowatts to an estimated 45 kilowatts.
The Coltraco Portascanner formed part of the real-time collaboration between construction crews working towards the project’s airtightness target.
Read the full Texas Pickle Hall Passive House airtightness case study for the project’s building-envelope details, mechanical strategy and recorded performance figures.
Building Airtightness Pre-Test Checklist
Before final blower door testing, ask:
- Is the airtight layer continuous across the entire building?
- Have windows, external doors and window frames been checked?
- Are wall, floor and roof junctions complete?
- Have all service penetrations been sealed?
- Have leaks found during construction been recorded?
- Has repaired work been checked again?
- Are internal doors and ventilation systems prepared correctly?
- Are temporary seals permitted by the test method?
- Is the selected blower door fan suitable for the building?
- Are building pressure and airflow requirements understood?
- Is the reporting route clear?
- Are site teams ready to respond if the first attempt identifies a problem?
The checklist cannot guarantee a particular blower door test result. It can give the team a clearer understanding of the building before final testing begins.
Make Airtightness Part of the Build
Building airtightness should be designed, constructed and checked throughout the project.
The final blower door test remains important because it measures the completed building. Waiting until that stage to begin looking for leaks, however, can make remedial work more difficult.
Mid-construction checks, clear site responsibility and local diagnostic testing can help teams act while the building envelope remains accessible.
Coltraco Ultrasonics supports this process through ultrasonic tightness-testing equipment designed to help investigate leakage points before, during or after blower door testing.
To discuss how Portascanner® AIRTIGHT could support your building airtightness process, contact the Coltraco Ultrasonics team.